Inventory-Tracker Rails api JavaScript frontend

The fourth software engineering project requires the app to use Javascript frontend with a Rails API backend. Client/server interaction must be handled asynchronously in JSON format. The Rails backend needs to have a resource with a has-many relationship and have at least 3 AJAX calls (at least two of Create, Read, Update, and Delete).

My JS + Rails API project is an Inventory tracking system that keeps a record of the items you own and where they are located. The object model relationship is a category has many items in its record. A screen shot is shown below.
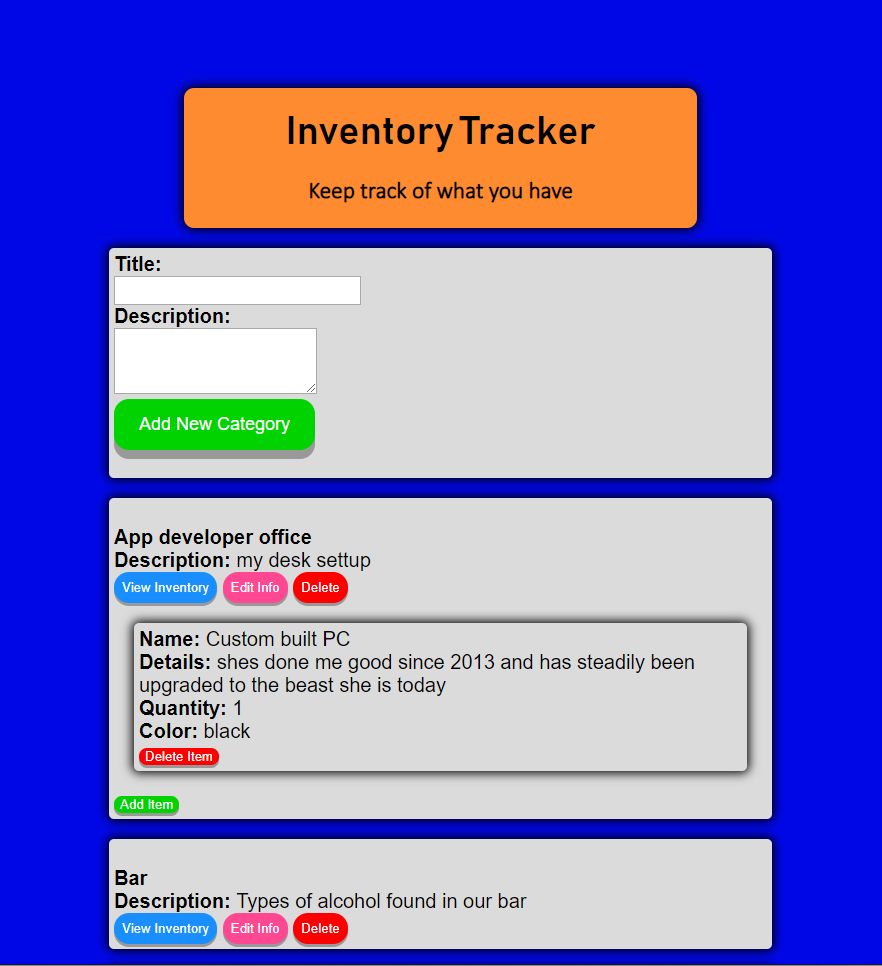
Inventory Tracker App

The project is structured such that the front-end is decoupled from the back-end. This partition allows me to run both ends at the same time, with Rails sever running on localhost:3000 while the front-end Javascript and HTML/CSS run separately on the browser. This partition also allows both ends to be deployed together or separately.

CORS

I uncommented the line gem ‘rack-cors’ to allow cross-origin resource sharing (CORS). CORS is a mechanism that allows restricted resources on a web page to be requested from another domain outside the server’s domain. It provides browsers a way to request remote URLs only when they have permission and allows servers to reject requests from unknown origins.

For this project, the config/initializers/cors.rb is configured to allow requests from all origins and to allow [:get, :post, :patch, :delete] requests to the API.
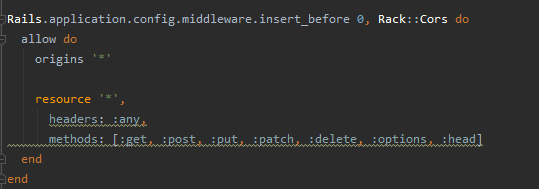
Allow requests from all origins

Serializer

I added the gem 'active_model_serializers' to serialize the data and select only the information I want to display. It also provides access to the has_many relationship with a single request.

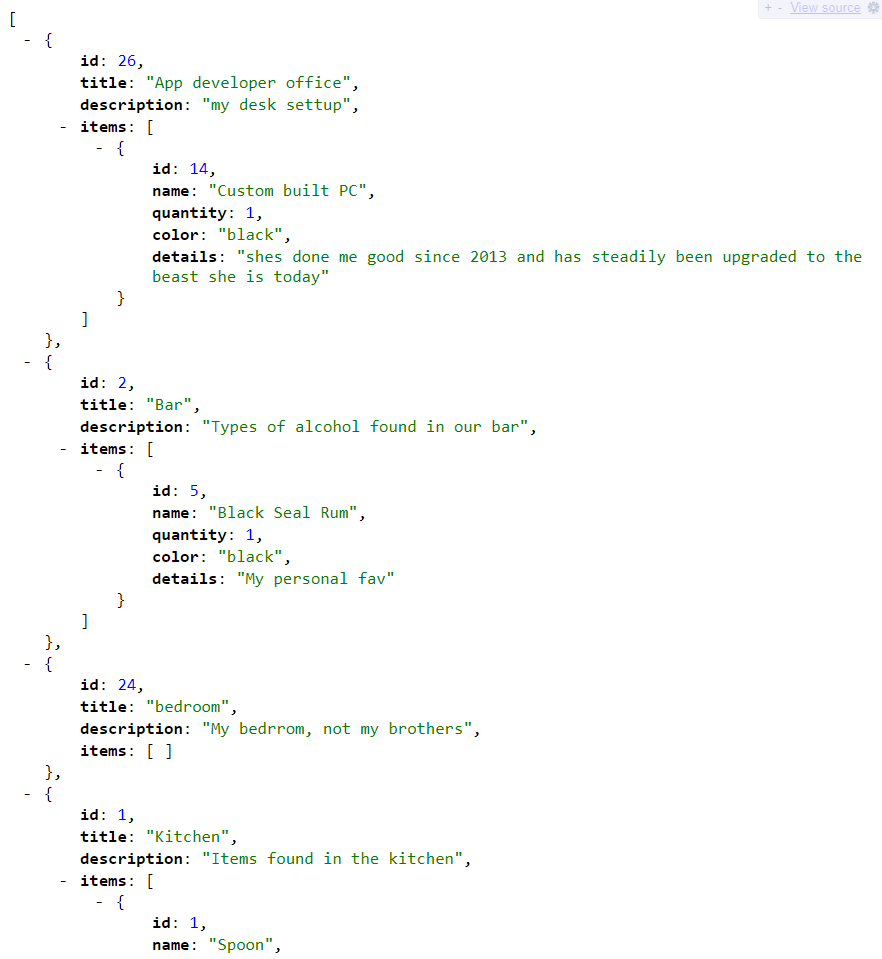
Category Serializer
http://localhost:3000/categories

Controller

All categories are rendered in the form of JSON. The category_params permits the parameters :title and :description, which must be included in the POST and PATCH requests made with Javascripts fetch.

class CategoriesController < ApplicationController
before_action :find_category, only: [:show, :edit, :update, :destroy]


def index
@categories = Category.all.order('title ASC')
render json: @categories
end

def show
@category = Category.find(params[:id])
render json: @category, status: 200
end

def create
@category = Category.create(category_params)
render json: @category, status: 200
end


def update
@category.update(category_params)
if @category.save
render json: @category, status: 200
else
render json: { errors: @category.errors.full_messages }, status: :unprocessible_entity
end
end

def destroy
category = Category.find_by(id: params[:id])
category.destroy
render json: category
 end


private

def category_params
params.require(:category).permit(:title, :description)
end

def find_category
@category = Category.find(params[:id])
end
end

Index.html

The index.html is set up to have div tags for the new category form (id="category-form") and for the list of categories (id="categories-list"). These divs are initially empty but are populated with the JSON response elements.
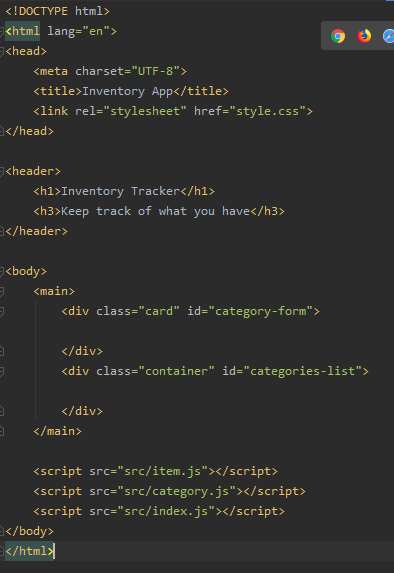
As JSON data is fetched, the HTML DOM is appended with elements to display the category and item properties. The basic structure is shown below.

      <div class="card" id="category-form">
        <! -- New category form here -->
      </div>      <div class="card" data-category-id="1">
        <!-- View Inventory button here -->
        <!-- Edit Category button here -->        
        <!-- Delete Category button here -->
 
        <!-- Category info -->        

        <div class="items" style="display: block;">
           <div class="card" data-item-id="1">
             <!-- Item info -->
             
             <!-- Delete Item button here -->
           </div>           <!-- Add Item button here -->
        </div>
      </div>

Fetching Categories

The DOMContentLoaded event fires when the initial HTML document has been completely loaded and parsed so that we can fetch the list of categories and render a new category form.

DOMContentLoaded Event
  1. The following events occur in the sequence to fetch the categories list and update the DOM.
  2. The getCategories function fires off an AJAX request to the index route in /categories.
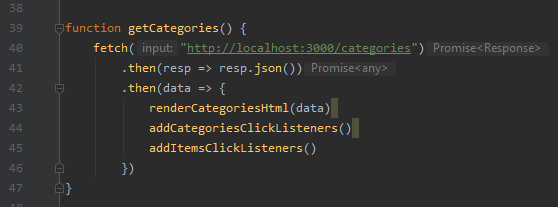
AJAX Request to Fetch Categories

3. The JSON response data is used to create new Category objects in renderCategoriesHtml. Each categories properties are appended to the id=”categories-list element. An element with an attribute called data-category-id is created with the category.id as shown below.
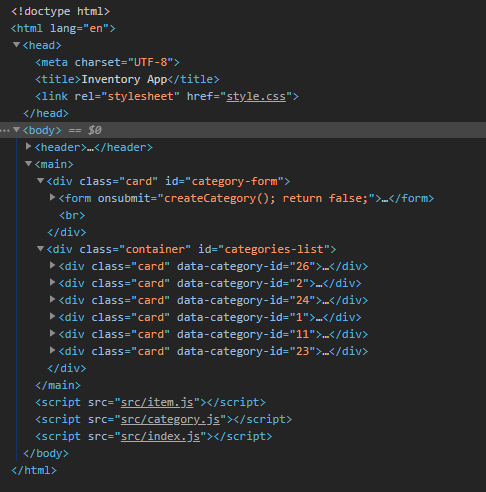
4. Nested inside each individual categories div data-category-id element is a div class=”items” element.
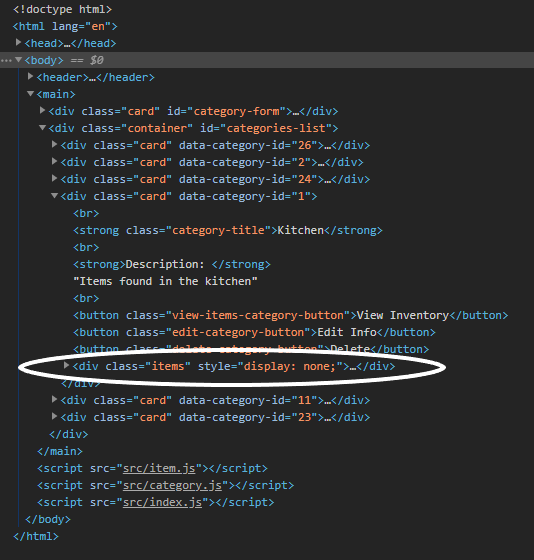
div class=”items”

5. Nested inside the div class=”items” element are elements containing item information with attribute data-item-id set to the categories item.id.
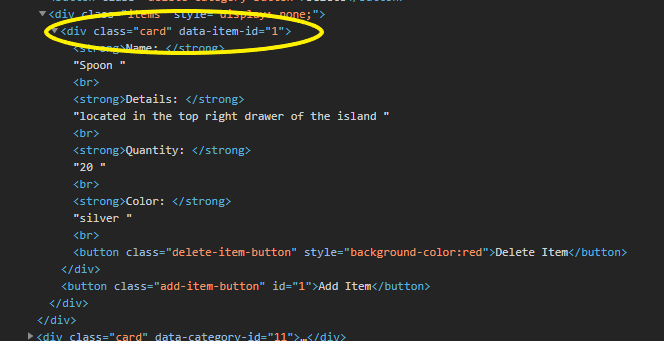
data-item-id attribute

Click Event Listeners

After the DOM is updated with the list of categories and their items, the addCategoriesClickListeners function is called. This function sets up the action handlers as a response to the user clicking on the edit button (to update the categories information), and the delete button (to remove the category).

Categories Click Listeners

Similarly, the addItemsClickListeners sets up the event handlers as a response to the user’s clicks on the View Inventory, New Item and Delete Item buttons.
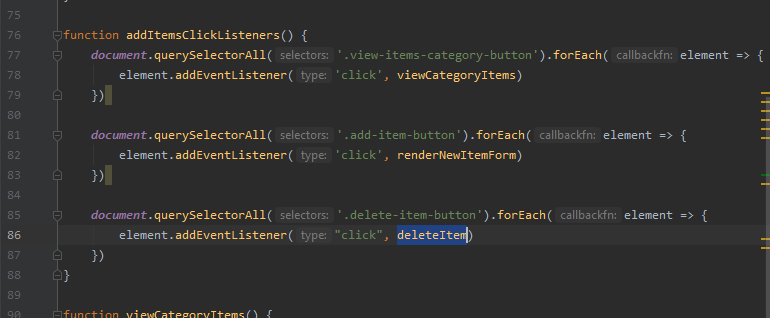
Items Click Listeners

Adding a New Category

The new category form is rendered as shown below. When the submit button is clicked, createCategory is called. The return false cancels the default submit action. Instead, the form submission is handled via JavaScript and not the URL.
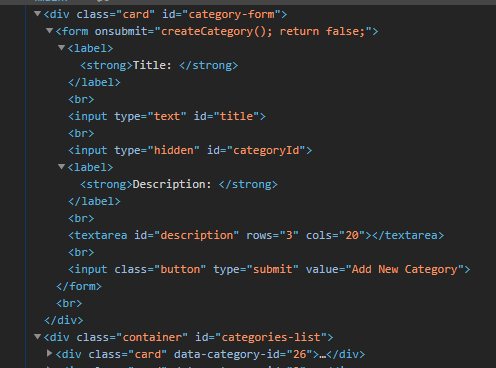
New Category Form

The createCategory function takes the values entered by the user in the new category form, creates a category object and attaches the stringified object to the body of the POST request.
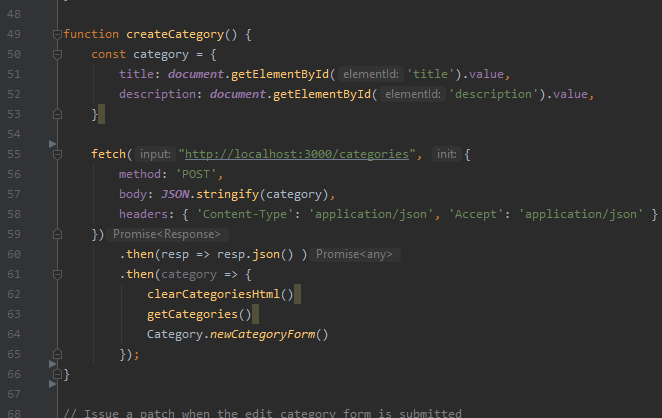
Calling fetch returns a promise. We can then wait for the promise to resolve by passing a handler with the then() method of the promise. The handler receives the return value of the fetch promise, which is the Response object.

Updating a Category

A categories information can be updated when the Edit button is clicked. The editCategory function first fetches the selected categories’ information and pre-fills the edit category form with the returned information. The user can modify the field values with new information.
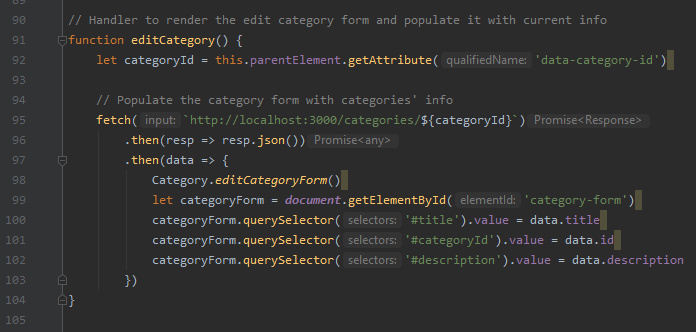
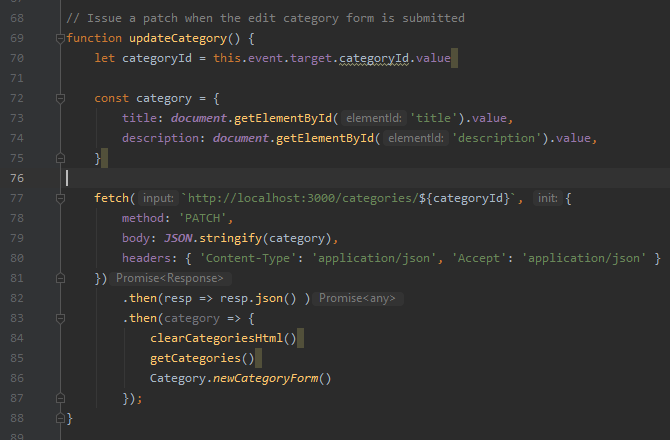
When the submit button is clicked, a PATCH is issued with the updated information as an object attached to the body of the fetch request.
Deleting a Category

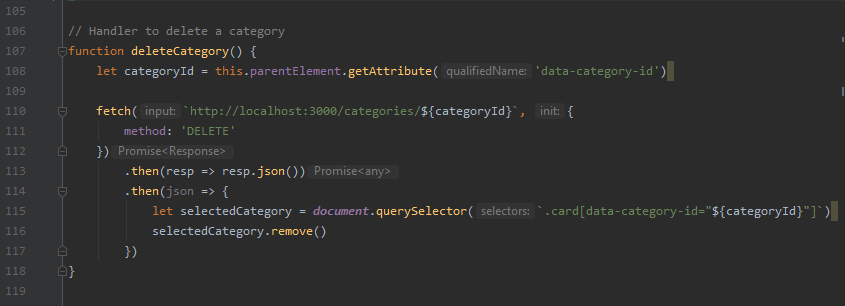
The deleteCategory event action handler issues a DELETE of the selected category and removes the HTML element with the categories data-category-id attribute.
Adding and Deleting Items

Rendering item information in the DOM is similar to the categories added and deleted functions.

Source Code

https://github.com/DesterStorm/Inventory-Tracker

Ruby on Rails App-Tester

Ruby on Rails (Rails) is a framework for creating simple web applications using the Ruby language. in this post I will walk you through App-Tester, my employee testing app. If you’re interested in the code, you can find it in this Github repository. You are welcome to make any contributions.

Devise Mailer setup

The Getting Started section of Devises README says the next step is, “At this point, a number of instructions will appear in the console. Among these instructions, you’ll need to set up the default URL options for the Devise mailer in each environment. ” To do this, navigate to your config/environments/development.rb file and find the line config.action_mailer.default_url_options = { host: 'localhost', port: 3000 }. If it is commented out, make sure to delete the # at the beginning of the line, and adjust your host and port accordingly. This will allow devise to send emails to the models it generates, if you use an email service that is.


Starting the MVC Structure

The most challenging task for any beginner in Rails (like me) is to structure the Model Views Controller correctly. Specifically in this case, the process of setting up the models. A helpful tool that can ease the structuring process of the Model Views Controller is a cool gem called Devise this is the link to the repo. Devise is designed and created by a large team and is a Ruby gem with the purpose of generating Users and other types of app accounts like Admin. You only need to install the gem by adding gem 'devise' to your gemfile and run bundle install in the terminal. Then, run rails generate devise:install.


Building the ActiveRecord associations

ActiveRecord has built-in macros for setting up object relationships. All you need to do is find the appropriate macros for your project. This application has many different relationships. For example, the client object looks like this:

include DeviseInvitable::Inviter

has_many :applicants, class_name: "User"
has_many :job_posts
has_many :exams, through: :job_posts
has_many :exam_questions, through: :exams

because it has the most control of the other objects. Whereas the Test model is used as a join table, creating an opportunity for a many to many relationship.

class Test < ApplicationRecord
belongs_to :user
belongs_to :exam
has_many :test_answers
accepts_nested_attributes_for :test_answers, :reject_if => :all_blank, :allow_destroy => true

Notice how Test belongs_to both :user and :exam. The User has_many :tests and has_many :exams, through: :tests. At the same time, the Exam has_many :tests and has_many :users, through: :tests. Now that a User and an Exam have the many-many relationship, they can interact with the child models of one another. This allows the User to take a test which gives the user an Exam. With that Exam, the User may also interact with the exam_questions and exam_answers they need to be able to even see the test they are taking. This is achieved by using:

accepts_nested_attributes_for :exam_questions, allow_destroy: true
accepts_nested_attributes_for :exam_answers, allow_destroy: true

Correctly establishing the model relations is the first step to making a fluid application. It is better to spend more time thinking about how you will set up the model relationships before you even start and have a solid plan going into the project than to start the project without a plan and establish relations along the way. A lesson I learned all too well with App-Tester. The plethora of bugs that were caused by improper relations at the beginning led to nearly countless headaches.


Uses Reasonable Validations

Encryption is crucial to protect a companies data. Using Devise to generate both Clients and Users adds password with their DatabaseAuthenticatable module. A description of the module can be found here. Devise also makes use of the module Validatable, which defends against invalid data for emails and password. If an email is unsuccessful in it’s login attempts too many times, the module for Lockable locks the account, making the user validate their account via email to use their account again. Devise is a widely used and versatile addition to any app that uses account validation to access features. The features that I have included which are only accessible to those with accounts are:

  1. The list of Job_posts
  2. The Job_posts corresponding Exams
  3. The ability for Users to take Tests that use the Exams as a building block

Because no “Guest” can access these without signing up, the User and Client models also act as validations for nearly all the data types in App-Tester.


Testing the pages

It is a rule of thumb to start carefully and test each step you do. Otherwise, you will find yourself in a series of unpredictable errors. I started with the application controller, confirming that the view pages work using the resource routes. Because there were multiple nested routes, I had to constantly look at each page when configuring any part of a nested relationships path.

Authenticate with GoogleOauth2

While devise enables excellent user authentication/validation, it is not as secure as Googles profile protections. At the same time, using an already existing Google account is significantly more convenient than filling out a new form. The steps to using omniauth-google-oauth2 can be found here

Clients controller

The Clients controller directory was generated by using the command rails g devise Client. It holds the controllers responsible for implementing the Client registrations, sessions, passwords, unlocks and confirmations. The authenticate method was used to confirm the password with the one being tracked by the password_digest column in the db.

Using Simple_form and partials

Simple_form tags allow us to easily make forms. I made use of the simple_fields_for method to create my nested forms which started with exam and went down the hierarchy of has_many/belongs_to until it went down to exam_answers and exam_questions which required input from the Client to create an exam. This process quickly got complex with the amount of nesting my models had. Because of the complexity of my multi-nested models, I opted for a _form partial. This is a file which has your form on it, but on the pages that use the form, you simply put

<% content_for :page_name, "Submit Your Test" %>

<%= render 'form' %>

This helped avoid a many headaches from needing to make multiple different forms.

Validating your entry fields

You can block the Client from bad entries, such as bad email formatting or leaving one of the fields empty. To do so, you need to use ActiveRecord validations for the entry fields. In the Client class model, I used the validatable shortcut format to authenticate the entry. A shortcut in accomplishing this is using the Devise gem. When a model is generated with rails g devise MODEL it automatically is generated with the validatable module that devise offers.

Conclusion

Rails is basically magic, and as a striving developer, I must practice and learn my craft until I become a wizard. To know how to use ActiveRecord, you need to parse through innumerable documents… Hence, you would learn a huge number of methods that you can add to your wizards tome.


Acknowledging contributing articles

  1. Rails-portfolio-project Github repository
  2. Devise gem this is the link to the repo
  3. Rails quiz blog post by Tressa Sanders
  4. DB browser for sqlite.
  5. RESTful guide table — Railsguide
  6. Validation methods ActiveRecord:Validation

Sinatra Applicant Tester

Sinatra is a Ruby framework for creating simple web applications with minimal effort. in this post I will walk you through my Applicant Tester list app. If you’re interested in the code, you can find it in this Github repository . You are welcome to make any contributions.


Structure the MVC

The most challenging task for any beginner in Sinatra (like me) is to structure the Model Views Controller correctly. Specifically, the process of setting up the environment. A helpful tool that can ease the structuring process of the Model Views Controller is a cool gem called corneal — this is the link to the repo. Corneal is designed and created by Brian Emory and is a Ruby gem with the purpose of generating Sinatra apps. You only need to install the gem by running gem install corneal and run corneal new <app name> in the terminal. Then, run bundle install to install all missing gems, that’s it! You may refer to the full instructions in the corneal README file for more information.


Building the ActiveRecord associations

ActiveRecord has built-in macros for setting up object relationships. All you need to do is find the appropriate macros for your project. This application has two relationships: the company object has_many applicants and the applicant object belongs_to a company.


Uses a password for authentication

Encryption is crucial to protect a companies data. ActiveRecord’s has_secure_password method accomplishes this perfectly. To utilize this macro, I took these steps:

  1. The application must have bcrypt-ruby gem installed.
  2. The companies create_table must have a string column for “password_digest”.

Then, you can use has_secure_password macro.


Start running your database(db)

In the db/migrate directory, you’ll see the companies_table and applicant_table. You have to create the table and identify the type of data. Then, in the terminal, run rake db:migrate to migrate your tables and obtain the schema file.

Testing the pages

It is a rule of thumb to start carefully and test each step you did. Otherwise, you will find yourself in a series of unpredictable errors. I started with the application controller, confirming that the index page works using get.

Applying CRUD and using RESTful routes

CRUD means Create, Read, Update and Delete. “… ,a RESTful route provides mapping between HTTP verbs, controller actions, and (implicitly) CRUD operations in a database.” (Railsguide)

Companies controller

The companies controller was responsible for implementing the company sign-in/out/up, and to edit the company profile. The authenticate method was used to confirm the password with the one being tracked by the password_digest column in the db.

Sign-up/sign-in forms

These simple HTML form tags allow us to use two main attributes: the action attribute, which I assigned to /signup route; and the method attribute, which is set to “POST.” Sign-in forms are easy, but can be tedious.

The ‘show.html.erb’ company profile page

To show the company his profile page, you will need to pull out company.name from the company object. This is achieved by using the ERB syntax — iterating over the company object and set the dynamic route to print out the company name of the current company using the company.id route.

Edit the company profile information

To edit, you have to use the PATCH HTTP verb, but it won’t work directly! The browser doesn’t support the POST and DELETE verbs. To overcome this issue, you have to make the following two steps:

  1. Use the Rack::MethodOverride inside your config.ru file. Allow the method to be overridden when the params[:_method] is set. This is the “middleman” that supports the PATCH/PUT and DELETE HTTP methods.
  2. Establish an input tag with the following attributes: id and type set to hidden, name to a “_method” and finally the value to “PATCH”.

and that’s it, the company can edit their profile.

Read a specific companies Applicant list

The second most challenging task (behind setting up a perfect environment) is to guarantee that the company is the only one permitted to view/edit/delete their related applicants. To do so, I used the binding.pry and checked out @applicants.methods to grab the targeted one. The QueryMethod that I chose was named “where.” It’s job is to search for a saved company ID in the db that matches the current company ID and display the corresponding Applicants list.

Validating your entry fields

You can block the company from bad entries, such as bad email formatting or leaving one of the fields empty. To do so, you need to use ActiveRecord validations for the entry fields. In the Company class model, I used the validates shortcut format to authenticate the entry. In the Models folder of the Company class, I created a constant for email format using RegEx.

Conclusion

ActiveRecord is basically magic, but to be a real modern day wizard, much more knowledge is required. To know how to use ActiveRecord, you need to parse through innumerable documents… Hence, you would learn a huge number of methods that you can add to your wizards tome.


Acknowledging contributing articles

  1. Sinatra-portfolio-project Github repository
  2. Corneal gem this is the link to the repo
  3. Github ToDo list repo for Salma71
  4. DB browser for sqlite.
  5. RESTful guide table — Railsguide
  6. Rack::MethodOverride documentation rubyonrails
  7. ‘Where’ query-method documentation ActiveRecord
  8. Validation methods ActiveRecord:Validation

CLI Data gem Project

DEVELOPMENT

My latest lab project on learn.co required writing a command-line Ruby gem that scrapes HTML to retrieve data and display it for the user. I thought it would be fun to use a scraper to retrieve a list of a strategies on how to always win at the game connect 4. I had been in limbo for a while while transferring from the full-time cohort to the part-time. Thanks to that, I had plenty of time to play around with the things I had been learning and build a connect 4 game. after that was done, I started building a scraper using Nokogiri and Open-uri to teach people how to play the game I had just built and play it very well.

After several days of research and coding the initial version of my project is finally complete! There were moments of confusion and frustration, as my instructor, zdrake, knows very well, but it was satisfying to figure out solutions and create a working CLI gem.

After going through the whole process, I am amazed to see how easy it is to publish and share working code with RubyMine on Github.

Starting the Gem

After watching Avi’s video tutorial and some experimenting, I started my project by using bundler to create a rubygem skeleton:

bundle gem Connect4

Then I had to decide on how I wanted to structure my application. I wanted my scraper to interact with the game so that you could play after reading or go back to the tips after finishing a game. to begin this task, I tested out with how I was going to scrape by getting the objective of the game from wikipedia and printing that to the CLI using this method:

def wiki
  html = open('https://en.wikipedia.org/wiki/Connect_Four')
  doc = Nokogiri::HTML(html)
  puts doc.css('.templatequote p').text.strip
  puts ' '
end

It occurred to me that instead of listing a all the tips in detail, my application needed to make a brief list to select from. Foolishly, I started scraping each tip individually without reading the full requirements of the project, and built custom scraping methods for each tip. A mistake well learned. Building the iterator to go through all the tips on the site had proven to be much more efficient than coding each tips custom method individually.

I needed a way to store the information about each individual tip, but also give the corresponding title. Since there were several different tips I wanted my application to display I decided to create the def get_info(strat_object) method in the Scraper class that would store each tip as an instance of a Strategy object in the add_step array.

Next I needed my application to actually output instructions and tips to the command-line and retrieve user input of the tip they wanted to see. My program still didn’t do anything because I needed to convert the user input into a more detailed scrape and parse the data on wikihow. After playing around in RubyMine, I knew the commands I needed to get the details, and I added the code to list the data. I continued to write code to retrieve the list and get details about the tips. I started making git commits along the way.

I ran into a good bit of trouble after trying to install my gem on my system. At first I thought it was because I was somehow not installing my gem correctly but after installing the daily_deal gem on my system I realized it was because I needed to fill out my gemspec file. I encountered my next problem when I tried to publish my gem to rubygems. I still had code in the gemspec for a push host whitelist.